
 |
| Step-by-Step Tutorials |
#4 - Scripting
101
|
|
A series
by RomanDA
|
Listing of other DX Tutorials:
Click here
Today's Lesson:
"Scripting 101" - UPDATED 5/08/07
Today we will learn how to do some
VERY basic scripting in DexktopX. Scripting in DX can be done with JavaScript as
well as VBScript, but since i know next to nothing about Javascript, I will be covering
VBScript.
Please Look over the previous 3 tutorials
so that we can skip up to some things here without redoing everything we have already
done. Things like Creating a new object, and changing font sizes, etc. I will not
cover those again, if you haven't look at the first 3 you will need to go back and
check them now.
For this and all the Step-By-Step
DX Tutorials you will need to purchase
DesktopX
for $14.95 from Stardock.
Lets get started.
STEP
1 - Create the object
Like I stated above, I am not going
to walk you thru everything here, so please look over the other tutorials first.
- Create a new object (see Tutorial
#1)
- Make it a TEXT object.
- Make the text large enough you
can see it on your desktop
- Add the text DATE: to
the object.
 (you can make it whatever color you want, and font)
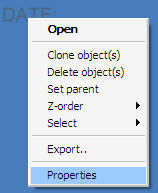
- RIGHT-CLICK on the new
object and select PROPERTIES
STEP
2 - Making your first Script
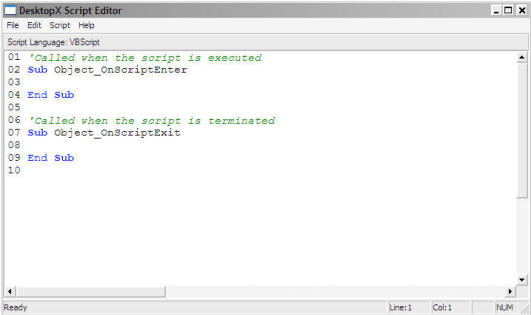
- From the PROPERTIES window
click on the NEW Button, next to SCRIPT.
- You will see the above screen
(DX always creates a OnScriptEnter and OnScriptExit subs.
- The ENTER is what runs when
you load up the object for the first time.
- The EXIT is what runs when you
close down your object.
- In this case we are going to
make the object show the current date when we load it up
- We are going to add a single
line of code in the OnScriptEnter Section:
- object.text
= date
- As you type in this info
you will see dropdowns that show the options you can use.
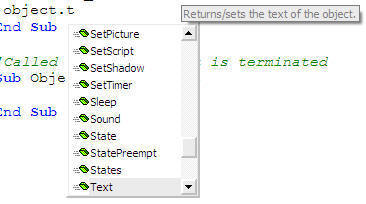
All you need to do is click on T in TEXT and this dialog will show up, so
you can hit enter as soon as the dropdown jumps to Text, or continue typing.
- That's it, lets cover what we
just did.
- object. - this is
how DX refers to the current object, so that it knows what object we are
working on.
- text - this is the
actual text of the object.
- = - is simply telling
it that the text EQUALS what comes next
- date - the date is
a built in function of visual basic. It is simply they current date.
- combining it all, it takes
the current object's text and makes it equal to the current date.
- Once this is all entered, click
on FILE then SAVE AND CLOSE Editor
- Then click on OK and
your TEXT on the desktop should show:
 (ok, it will show the REAL date, not the date I made this - lol)
STEP
3 -
Adding some more info
to the script
Hopefully the above wasn't to confusing,
it worked, and your ready to add a little more to it.
- RIGHT-CLICK on the the
object and in the menu you will now have a few different options
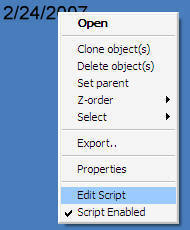
- You will want to click on
EDIT SCRIPT
- You should see the same EDIT
window you saw above.
- Let's add some text to the item.
- edit the line object.text
= date
- to look like: object.text
= "Date: " & date
- What this does is put the text
Date: before the date itself. the & is used to join the 2 items.
- click on FILE then
SAVE AND CLOSE Editor
- Then click on OK and
your TEXT on the desktop should show:

STEP
4 - Lets add some TIME
We are going to make this into a
time object, with the current time being displayed at all times. To do this we need
to add a TIMER to the object. Timers are just what they sound like, they perform
an action at set intervals. You can have multiple timers running at the same time,
they can be at different intervals. Lets see how this looks in the code:
- RIGHT-CLICK on the object
and select EDIT SCRIPT
- We need to move some things
around, please copy/paste the below code into your object.
- Note the yellow text is only
Comments, that's why they have a ' before them.
|
'Called when
the script is executed
Sub Object_OnScriptEnter
Object.SetTimer 1, 1000
'-- This turns on a timer called 1000 and runs what's in there every 1,000
milliseconds or 1 second
End Sub
Sub Object_OnTimer1
'-- This
is the Timer we started above, notice the 1 is the same as the 1, in our
SetTimer call?
'---
FormatDateTime(now,3) returns the complete time in the format: hh:mm:ss
am/pm
CurTime
= formatdatetime(now,3)
object.text = "Date: " & date & vbnewline & "Time: " & CurTime
'The vbnewline is a linefeed/break putting the time on a line UNDER the
date
End Sub
'Called when
the script is terminated
Sub Object_OnScriptExit
object.KillTimer 1
'--- This shuts
the timer off when the widget closes
End Sub
|
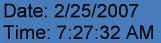
- click on FILE then
SAVE AND CLOSE Editor
- Then click on OK and
your TEXT on the desktop should show:
- There will be a LAG of 1 second
before this shows on the screen because it has to wait that 1 second before
the Timer fires off. You can remove this lag by adding the following line right
below the object.settimer line, so the Object_OnScriptEnter would
look like this:
|
'Called when
the script is executed
Sub Object_OnScriptEnter
Object.SetTimer 1, 1000
Call Object_OnTimer1
End Sub |
Update for other Date
Formats:
There are a lot of places in the
world where the date isn't in the format mm/dd/yyyy. To handle that,
VAD_M has created a great function
that will convert any date format to the current;y selected format of your system.
Lets show what our code looks like if we add VAD_M's code:
|
'--- NEW CODE
or CHANGE
'Called when
the script is executed
Sub Object_OnScriptEnter
Object.SetTimer 1, 1000
'-- This turns on a timer called 1000 and runs what's in there every 1,000
milliseconds or 1 second
End Sub
Sub Object_OnTimer1
'-- This
is the Timer we started above, notice the 1 is the same as the 1, in our
SetTimer call?
'---
FormatDateTime(now,3) returns the complete time in the format: hh:mm:ss
am/pm
CurTime
= formatdatetime(now,3)
object.text = "Date: " &
FormatDate(date)
& vbnewline & "Time: " & CurTime
'The vbnewline is a linefeed/break putting the time on a line UNDER the
date
End Sub
'Called when
the script is terminated
Sub Object_OnScriptExit
object.KillTimer 1
'--- This shuts
the timer off when the widget closes
End Sub
Function
FormatDate(xdate)
On Error Resume Next
Dim  ,s1,s2,sx ,s1,s2,sx
If instr(xdate,"/") > 0 Then
s1 = "/"
ElseIf instr(xdate,".") > 0 Then
s1 = "."
ElseIf instr(xdate,"-") > 0 Then
s1 = "-"
End If
Set objShell = CreateObject("WScript.Shell")
= objShell.RegRead("HKEY_CURRENT_USER\Control Panel\International\sShortDate")
s2 = objShell.RegRead("HKEY_CURRENT_USER\Control Panel\International\sDate")
Set objShell = nothing
sx = split(xdate,s1)
If left(LCase(),1) = "d" Then = sx(1)&s2&sx(0)&s2&sx(2) Else = sx(0)&s2&sx(1)&s2&sx(2)
FormatDate = FormatDateTime(,2)
Set = nothing
Set s1 = nothing
Set s2 = nothing
Set sx = nothing
End Function
|
CONCLUSIONN
Ok, you now have a working date/time
clock on your desktop now.. woo hoo.. LOL I hope this first step into scripting
in DX has shown you how simple it can be. I will continue to work on scripts for
the next 2-3 tutorials, mainly the basics, if you want more complicated Tutorials
look over my older ones on the
index page.
I know this is some very basic stuff,
but that is the idea, most people are afraid of scripting, and I want to show that
anyone can get in there and at least get started on scripting.
I hope you have enjoyed this step
into DX, and look forward to the next installment..
